Having a refrigerator light that won’t turn on or stay on can be inconvenient and frustrating. But fixing a GE refrigerator light is usually an easy DIY project you can tackle without calling for service.
Quick Fix Summary
| Problem | Likely Causes | Solutions |
|---|---|---|
| The light is not turning on | Burned-out bulb, faulty switch/control, loose connection | Replace bulb, check/replace switch, check wiring |
| Light stays on | Faulty switch, pinched wire, control board issue | Replace the switch, inspect the wiring, and replace the control board |
Before troubleshooting, try restarting your GE refrigerator and check for error codes
Step-by-Step Instructions
Follow these steps to troubleshoot and fix common GE refrigerator light problems:
1. Make sure the refrigerator is plugged in
Before doing anything else, check that the refrigerator is getting power. Plug something else into the outlet to confirm electricity is flowing properly.
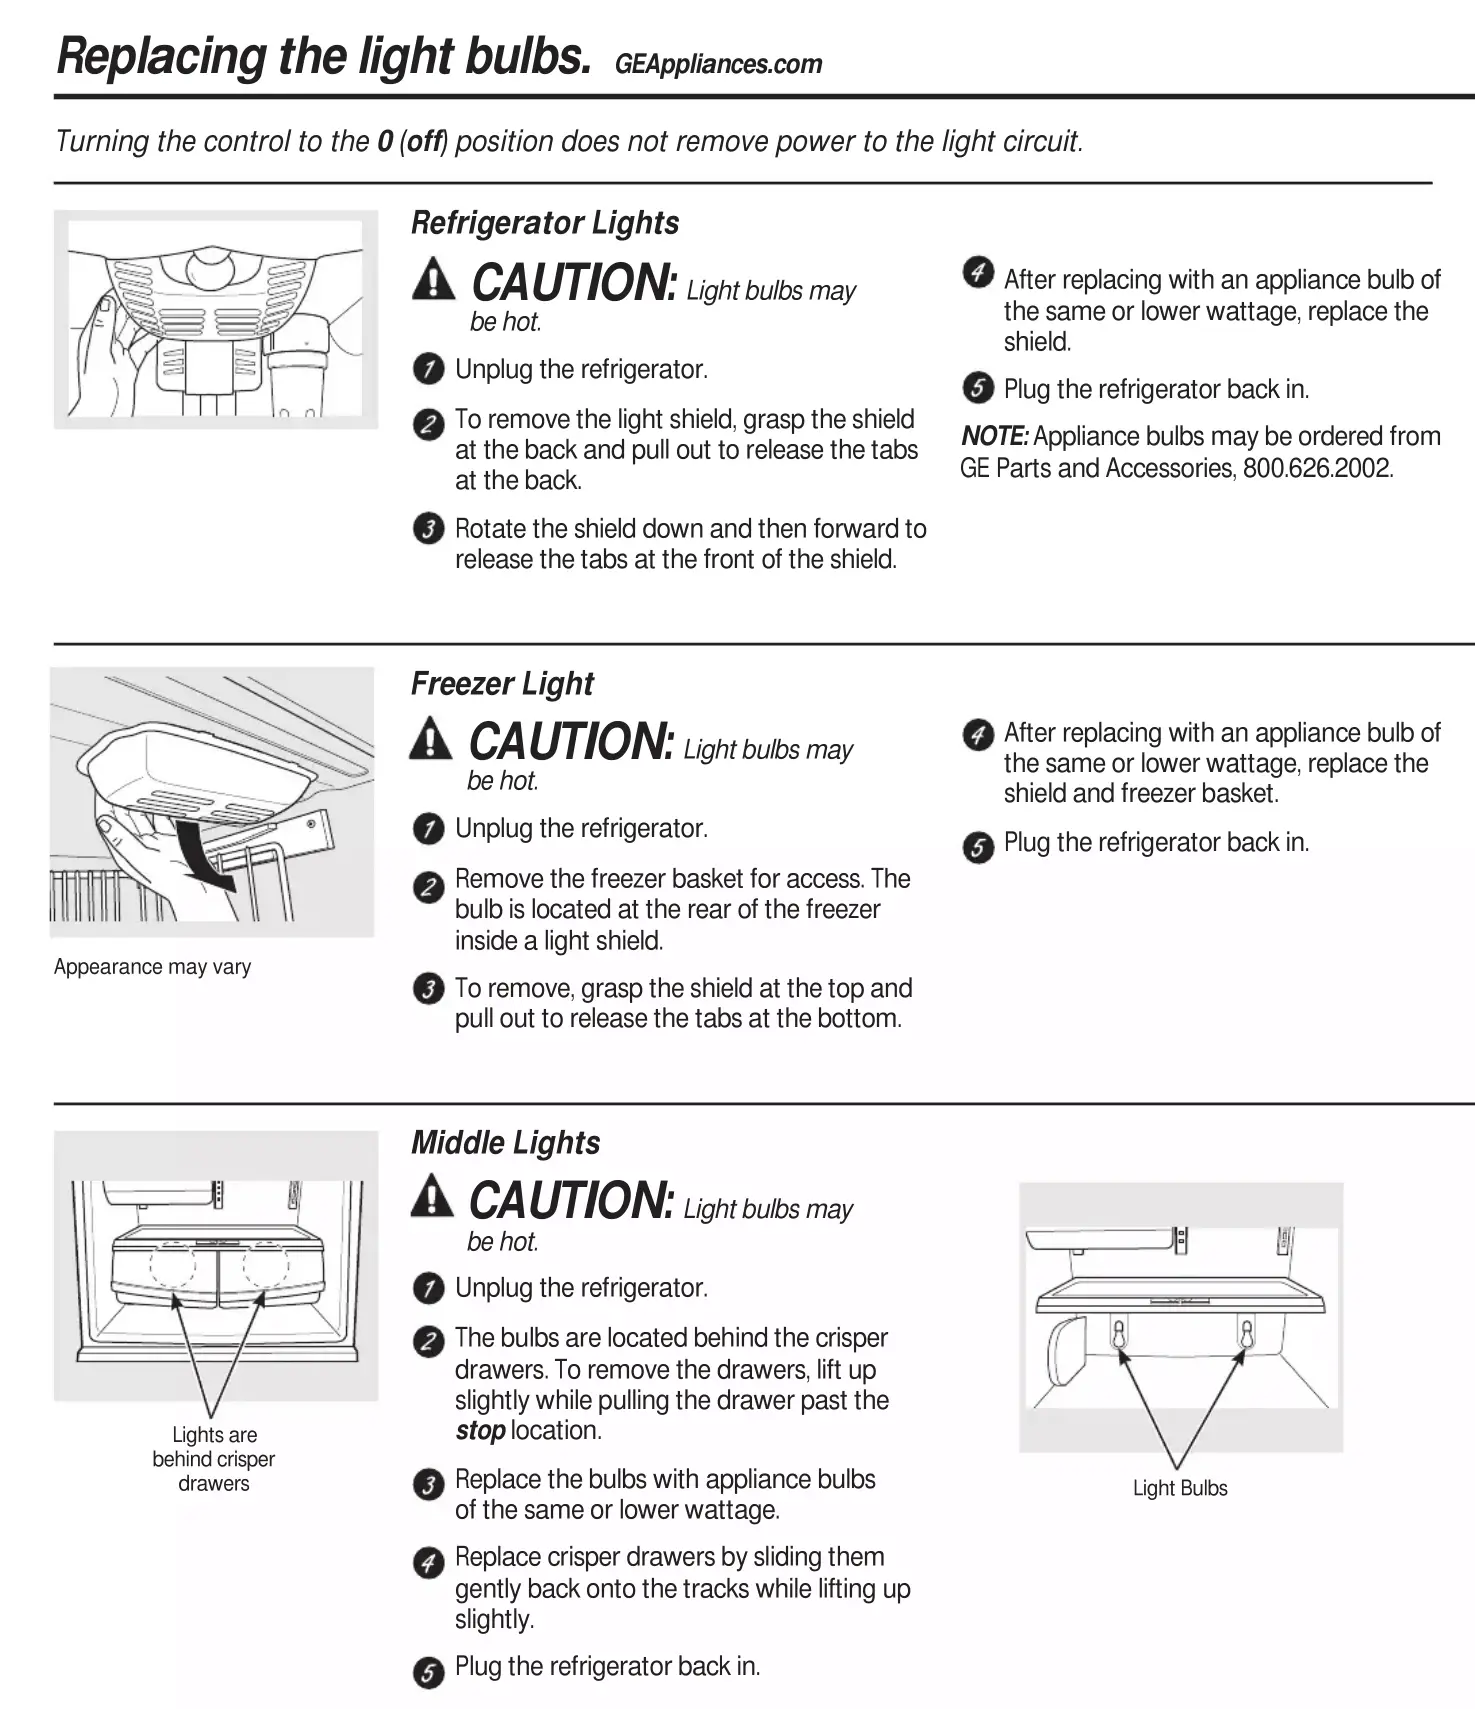
2. Replace the light bulb
A burned-out bulb is the most common cause of a refrigerator light not turning on. Replace the old bulb with an appliance bulb of the same type and wattage.
- Unplug the refrigerator
- Remove the light cover by squeezing the sides
- Unscrew the old bulb and install a new one
- Replace the light cover and plug the fridge back in
3. Check the light switch
If a new bulb doesn’t fix the problem, the issue could be with the switch itself.
- Carefully remove the light cover to access the switch
- Use a multimeter to check for continuity through the switch when activated
- If there is no continuity, replace the faulty switch
4. Inspect wiring connections
Loose wiring can interrupt power flow to the light.
- Unplug the fridge and remove the light cover
- Check that wiring terminals are securely attached
- Make sure no wires are pinched, or insulation is damaged
- Repair connections and reassemble
5. Replace control board
If the above steps don’t resolve the issue, the problem may be with the control board. You’ll need to have the faulty control board replaced by a technician.
6. Bypass light switch
If the light stays on continuously, you can bypass the switch as a temporary fix:
- Unplug the fridge and remove the light cover
- Disconnect light switch wires
- Splice light wires together using a wire nut
- Turn the power back on to test
This will keep the light on constantly, but you’ll still want to replace the faulty switch.
Helpful Tips
- Use flathead screwdrivers and needle-nose pliers to access tight spaces
- Be careful not to touch wires together while energized
- Ensure bulbs are appliance-rated for humidity and colder temperatures
- When in doubt, consult a refrigerator repair technician
Credit: Parts Dr/ Youtube
FAQs
1. Why does my GE refrigerator light keep burning out?
Voltage fluctuations or a faulty light socket can cause frequent bulb burn-outs. Try replacing the socket if the new bulbs don’t last.
2. One side of my refrigerator is dark. What should I check?
Check that side’s light wiring for loose connections if one refrigerator compartment light is out. Also, confirm the bulb is secure in the socket.
3. The light works but flickers. What’s wrong?
A flickering light usually indicates a faulty bulb, but it can also signal a loose connection that needs cleaning and re-securing.
4. My GE fridge light stays on even when the door closes. How do I fix this?
If the light remains on continuously, the switch is likely faulty and needs to be replaced. You can also disconnect the switch to keep the light permanently on.
Conclusion
With basic household tools and mechanical skills, you can troubleshoot and fix many common GE refrigerator light issues on your own without paying for a repair visit. Start by replacing the bulb and switch, then inspect the wiring connections throughout the circuit. If problems persist with no faulty components found, consult with a refrigerator technician for further diagnosis and control board replacement if needed. Paying attention to the light warning signs and addressing problems promptly can help prevent food spoilage.
My Take on This Topic
As a refrigerator expert, I’ve worked on numerous GE refrigerators with lighting issues. In my experience, burning out bulbs prematurely is a common problem typically caused by failing door switches or sockets. I’ve also seen my share of melted wire insulation and loose connections interrupting power flow. Replacing the inexpensive light switch tends to solve the majority of continuous lighting problems.
Modern refrigerators rely heavily on those control boards, too – if freezer temperatures start fluctuating, that’s usually a surefire sign of control board failure requiring replacement. When it comes to DIY troubleshooting, I applaud the ambition but caution against poking around live wires unless you know exactly what you’re doing. For any sign of electrical malfunction, or if you don’t feel fully confident making the repair yourself, make the smart choice and call in a pro.